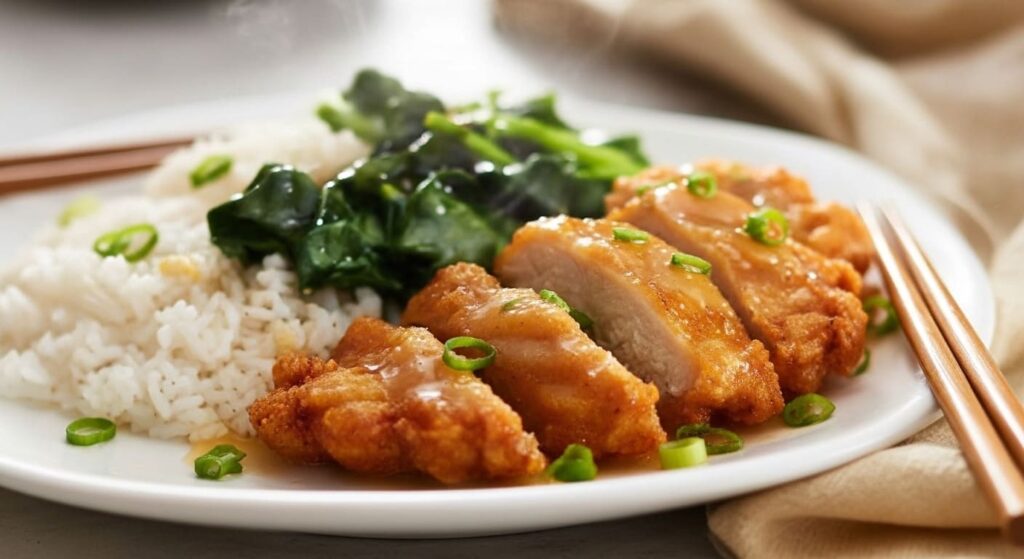
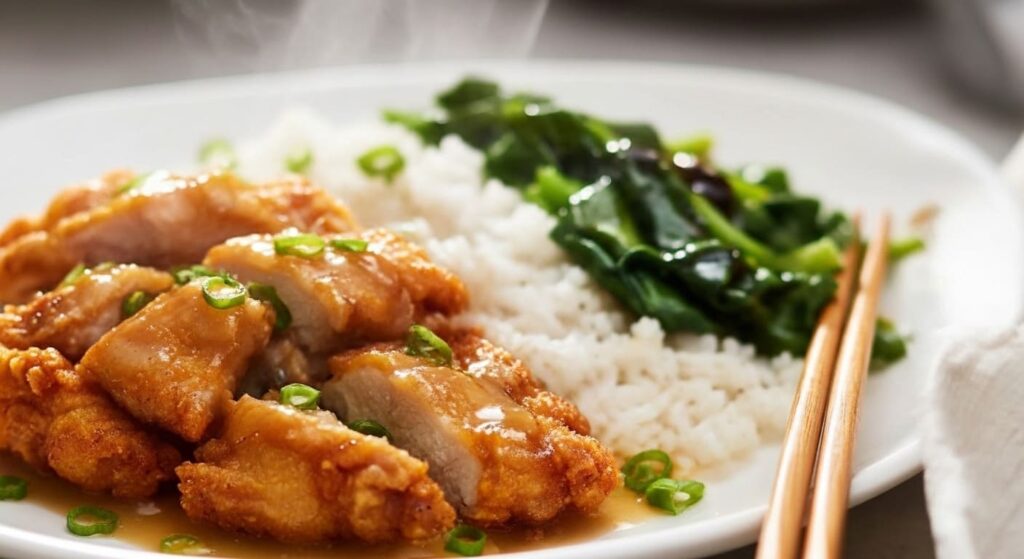
This is Crispy Chinese Lemon Chicken the nostalgic way: crunchy battered chicken cutlets, sliced and smothered in a glossy, sweet-and-tangy lemon sauce. Pure comfort food.
Crispy Chinese Lemon Chicken
Lemon Chicken may be missing from the menus of fashionable modern Chinese restaurants, but it remains a staple of suburban Chinese dining—and a lifelong favourite of mine. I love it unapologetically.
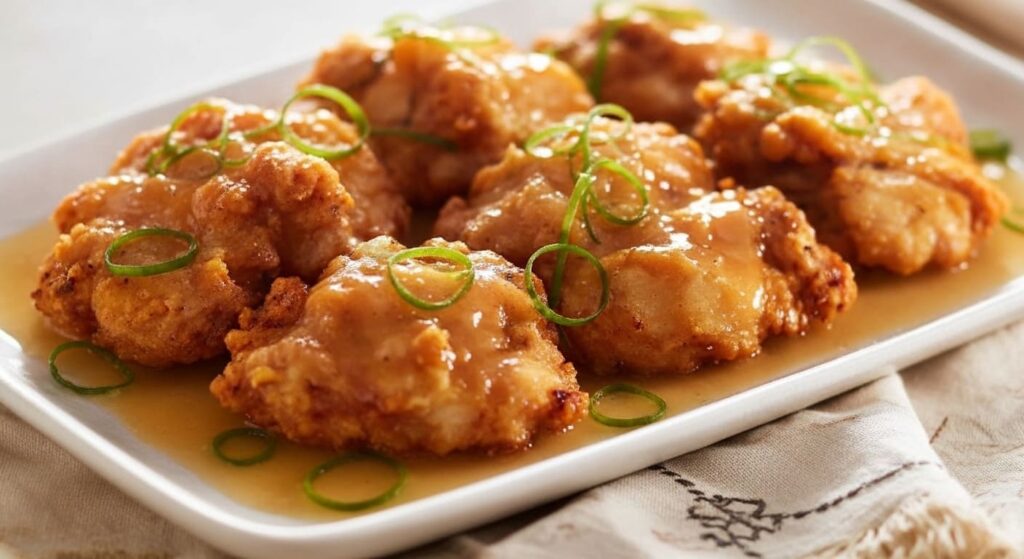
While the internet seems to prefer Lemon Chicken in bite-sized chunks, I stick with tradition: full battered chicken cutlets, sliced and smothered in sauce.
I do take some liberties with the sauce—most versions I’ve tried are way too sweet and don’t pack enough real lemon punch. So I turn up the bright, zesty lemon flavor and ease back on the sugar. I also use a batter that stays crispy longer than the usual kind, so it doesn’t turn soggy the moment it meets the sauce.
If you’ve only ever had Lemon Chicken from a restaurant, I promise you’ll fall in love with this homemade version!
Crispy Lemon Chicken ingredients
Here’s everything you need to whip this up
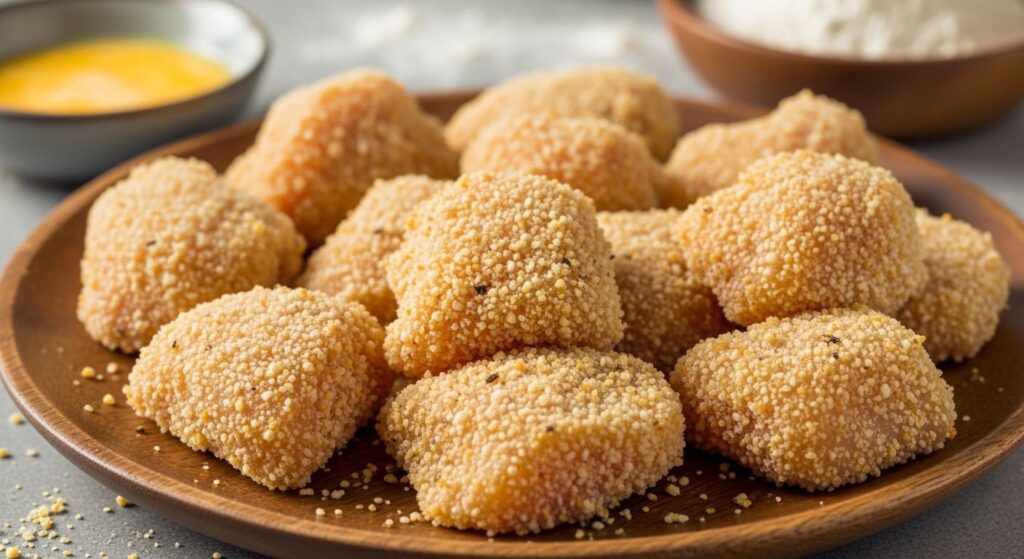
1. Crispy battered chicken
The crust on Chinese Lemon Chicken is light and slightly puffy, similar to a beer-battered fish. It won’t stay perfectly crispy once it’s coated in lemon sauce, because the sauce contains more water than the sticky glazes used for other fried Chinese dishes, like Honey Prawns or Honey Chicken. But this batter holds up better than most, which often go soggy within seconds. The secret? A mix of flour and cornflour, ice-cold soda water (the fizz creates a lighter crust, and cold batter hitting hot oil gives extra crispiness), and the double-fry method.
Chicken – I prefer boneless thighs because they’re juicier and develop those gnarly, craggy edges that give extra crunch. Plus, this is what you usually see at Chinese restaurants, where dark meat is favored over lean breast.
That said, chicken breast works perfectly too! You’ll just need two, split horizontally into thin “steaks” so they cook evenly.
Cornflour and Regular Flour – Each brings something different to the batter. Cornflour makes it crispier but doesn’t go golden or puffy (baking powder doesn’t work with cornflour). Plain flour isn’t as crispy or long-lasting, but it fries to a lovely golden color and puffs up nicely with baking powder. Using both gives the best of both worlds: crisp, puffy, golden chicken.
Baking Powder – Just a tiny bit—about ¼ teaspoon—makes the batter puff up light and airy instead of hard.
Cold Soda Water (or Club Soda / Seltzer) – Not naturally carbonated mineral water. We want the man-made fizz, which helps the batter puff, and the cold temperature is key: when ice-cold batter hits hot oil, it crisps instantly.
Oil – Any neutral-flavored oil suitable for deep frying works: vegetable, canola, or peanut oil. Once used, the oil is clean enough to reuse for other frying or sautéing.
Green Onion – Totally optional for garnish. Fun fact: I’ve never seen Lemon Chicken garnished in a Chinese restaurant!
No Egg – You’ll notice the batter has no egg. Egg tends to make fried batters less crispy, and we don’t need it here since we’re not using breadcrumbs.
The Lemon Sauce
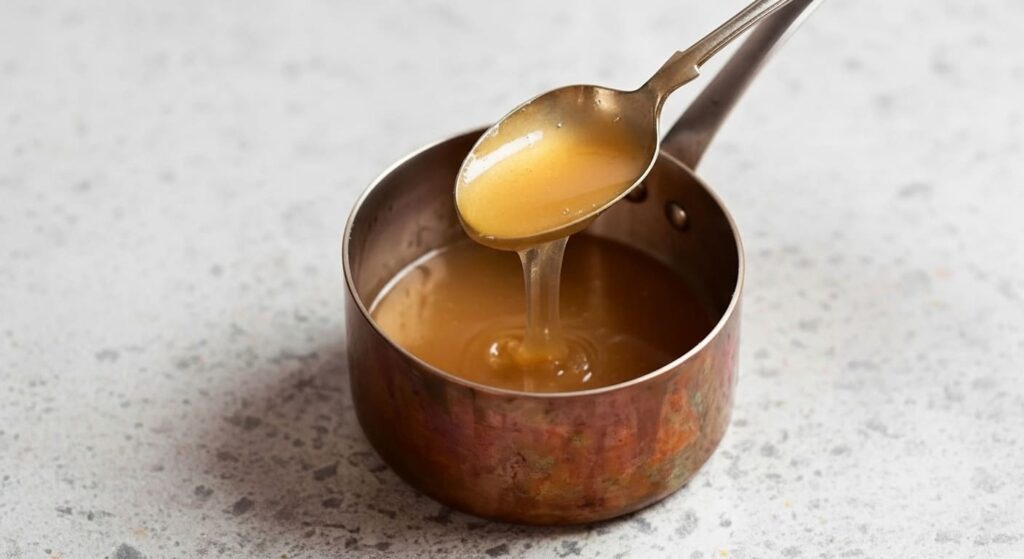
As mentioned earlier, I like a sauce that’s bright and zesty, not overly sweet. If you prefer it sweeter, you can always add a little extra sugar at the end—but I promise, it’s usually perfectly balanced as is.
Lemons – Nothing beats fresh lemons for that bright, zesty flavor! In a pinch, bottled lemon juice works too. 🙂
Ginger and Garlic – Just ½ teaspoon of each adds a subtle hint of flavor. Grate finely with a microplane so the sauce stays smooth and lump-free.
Chicken Stock or Broth – Using stock instead of water gives the sauce real depth. Water alone can taste a bit flat and one-dimensional.
Chinese Cooking Wine (Shaoxing Wine) – This adds saltiness and an extra layer of flavor, giving the sauce that authentic Chinese restaurant edge. If you prefer alcohol-free, it’s fine to skip—just add a pinch of salt to replace the saltiness of the wine.
Sugar – I use ⅓ cup (70g), which balances the tart lemon without being overly sweet. You need enough sugar to tame the sourness, but it shouldn’t be tooth-achingly sweet.
Cornflour (Cornstarch) – This thickens the sauce and keeps it glossy. Flour would make the sauce cloudy. Tip: If you plan to make the sauce ahead, arrowroot works better than cornflour because cornflour-thickened sauces can thin out when reheated. Use the same amount as a substitute.
How to make Crispy Chinese Lemon Chicken
Getting chicken to stay extra crispy comes down to two things: the shock of cold batter hitting hot oil (a well-known trick in the culinary world) and the double-fry method—a not-so-secret Asian technique for crispier, less greasy fried food. I use this approach in most of my deep-fried recipes.
The double-fry method also makes life easier in the kitchen. No messy, last-minute frying panic—just fry once, clean up, get your plates ready, and give the chicken a quick second fry right before serving. Perfectly crispy and stress-free!
Lemon Sauce – Start by whisking the cornflour with a splash of chicken stock until smooth and lump-free (less liquid helps it dissolve better). Then whisk in the remaining ingredients. Simmer for about 3 minutes until it thickens to a thin, honey-like consistency. It may seem very thick at first, but trust the process—it will loosen after a minute. Keep in mind, the sauce will continue to thicken as it cools.
Refrigerate Dry Ingredients – Before you make the batter, whisk together the flour, cornflour, salt, and baking powder in a bowl, then keep it chilled in the fridge while you prepare the chicken. This ensures the batter stays extra cold, which is key for maximum crispiness.
Pound the Chicken – Using a meat mallet, skillet, or saucepan, gently pound the chicken until it’s about 0.7 cm (1/3″) thick. Cover the meat with a freezer bag or a “Go-Between” sheet to protect it from tearing. (A Go-Between is like thicker cling wrap that doesn’t stick to itself—sold alongside cling film at the grocery store. It’s perfect for keeping stacked food from sticking or for protecting meat while pounding.)
Dust the Chicken – Spread cornflour on a plate. Sprinkle the chicken with salt, then press it into the cornflour, shaking off any excess. Place the coated pieces on a plate and set aside.
The cornflour serves as a protective layer, keeping chicken juices from making the batter soggy while also giving the batter something to cling to for extra crispiness.
Heating the Oil – Begin by heating the oil to around 160°C (320°F). I like to use a Thermapen to check the temperature. You’ll need about 4 cm (1.6″) of oil so the chicken can float freely while cooking—if it sticks to the bottom, the batter can tear, and tears are sad. Don’t worry, the oil stays clean enough to reuse for regular cooking afterward.
Use a heavy-based pot for safety and even heat retention, since the oil temperature drops quickly when you add food. I use my 24 cm (9.4″) cast iron pot. A skillet—even a deep one—usually isn’t deep enough.
Cold, Fizzy Batter – Just before frying, whisk in the soda water. Check the batter thickness: if it’s too thick, it will puff up massively; too thin, and it won’t stick to the chicken or may break off during cooking.
Pro Tip: The shock of ice-cold batter hitting hot oil is what makes the chicken extra-crispy and helps it stay that way. If you’re making a large batch—or get distracted by a chatty aunt—keep the batter in the fridge until you’re ready to use it.
Coating the Chicken – Dip each piece of chicken into the batter, holding it up for a few seconds to let any excess drip off. The batter should be thick enough to fully coat the chicken, with just a hint of translucence.
First Fry (Low Temperature) – Fry the chicken for about 3 minutes until it’s very pale golden—almost white—but the batter is crisp, puffed, and set. The coating comes out crispy straight from the oil, though it will soften slightly as it cools.
Tips: Don’t touch the chicken for the first minute to let the batter properly adhere. Then carefully turn it halfway through. I usually fry two pieces at a time—they just fit. If your pot is smaller, fry one piece at a time to avoid overcrowding, which can make the batter soggy.
Cooling Between Fries – Transfer the chicken onto a paper-towel-lined tray and repeat Fry #1 with the remaining pieces. Let the chicken cool for at least 20 minutes—or longer if needed—before the second fry. Trust me, letting it rest makes all the difference for extra-crispy chicken; I’ve tested it both ways, and the difference is clear.
While the chicken is cooling, it’s the perfect time to whip up the Lemon Sauce and prep any side dishes (see my serving suggestions below). Don’t worry if the crust softens a bit as it cools—that’s normal. Fry #2 is what gives it that superior crunch.
Second Fry (High Temperature) – Time to crisp things up! Heat the oil to 200°C (390°F) and fry the chicken for about 3 minutes until it turns a deep golden color, flipping halfway through. You can slightly crowd the pot for this round; I usually fit 2–3 pieces at a time, but never more than 3 to keep the crust perfect.
Slicing – Once Fry #2 is done, transfer the chicken back onto a paper-towel-lined tray while you finish any remaining pieces. Slice the chicken into 1.5 cm (0.6″) pieces—perfect bite-sized portions for maximum crunch.
Saucing and Serving – Arrange the sliced chicken on a serving plate or individual plates, then spoon over the warm lemon sauce. If the sauce has thickened, loosen it for a minute over low heat, adding a teaspoon of water at a time if needed. Garnish with green onions and lemon slices, if you like, and serve immediately. And don’t forget to tell everyone to EAT FAST—this is the ultimate way to enjoy that perfectly crispy crust!
What I serve with Lemon Chicken
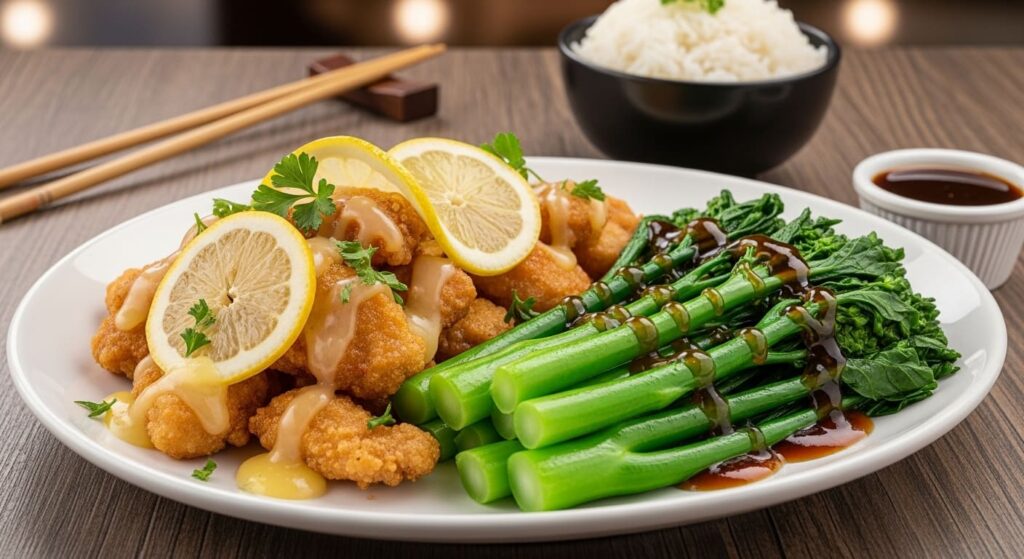
I served the chicken with Chinese broccoli and oyster sauce—the classic Yum Cha-style combo—and plain steamed rice, which is perfect for soaking up every drop of that zesty lemon sauce. Of course, you could easily upgrade to fried rice or even buttery garlic rice (how did I not think of garlic rice sooner?!).
For a bigger feast, why not add a side of Char Siu Chinese BBQ Pork? It’s oven-baked, so you won’t be juggling multiple stovetop dishes at once. And as I’ve mentioned before, making the fried rice ahead of time and reheating it in the microwave is totally fine. Serving a multi-course meal should feel effortless and elegant, not like a panicked scramble!
PS: The irony, of course, is that I’ve never once heard my name paired with the words “effortless” or “elegant,” whether cooking is involved or not. 😆
PPS: Yes, I may be a little obsessed with extra-crispy fry batter (guilty as charged), but even when the crust softens from sitting in sauce, Lemon Chicken is still delicious—and let’s be honest, that’s how it’s served at restaurants. What I don’t want is greasy, soggy crust within seconds of saucing, which happens all too easily due to the high water content in lemon sauce—unless you follow the extra-crispy steps in this recipe. If I say the word crispy one more time… send help.